3. 폴더 생성, home.jsp
-폴더 생성 <참고 Spring 일지 #1>
-Spring 설치하기(vscode)
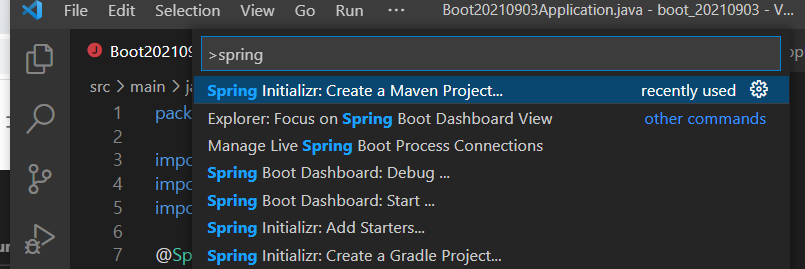
*vscode에서 설치
사진과 같이 Spring 검색 후 4번째 파일 spring boot extention 설치 후 재시작

*상단 view 에서 검색창 실행 후 spring 검색 이후 maven 항목 설치
2.5.4 버전 선택 -> java 선택 -> com.example -> 파일 이름 입력(boot_20210914) -> jar(개발용,war : 배포용) -> 11 -> dev tools, lombok, web 선택
-> d 드라이브에 boot-workspace 폴더에 설치
*dependency 설치 (pom.xml)
<!--web 개발용-->
<dependency>
<groupId>org.springframework.boot</groupId>
<artifactId>spring-boot-starter-web</artifactId>
</dependency>
<!--tomcat embedded was--><!-- node v8 엔진-->
<dependency>
<groupId>org.apache.tomcat.embed</groupId>
<artifactId>tomcat-embed-jasper</artifactId>
<scope>provided</scope>
</dependency>
<!--소스 코드 변경 시 was 자동 구동-->
<dependency>
<groupId>org.springframework.boot</groupId>
<artifactId>spring-boot-devtools</artifactId>
<scope>runtime</scope>
<optional>true</optional>
</dependency>
<!--lombok-->
<dependency>
<groupId>org.projectlombok</groupId>
<artifactId>lombok</artifactId>
<optional>true</optional>
</dependency>
<!--단위 테스트 도구-->
<dependency>
<groupId>org.springframework.boot</groupId>
<artifactId>spring-boot-starter-test</artifactId>
<scope>test</scope>
</dependency>
</dependencies>
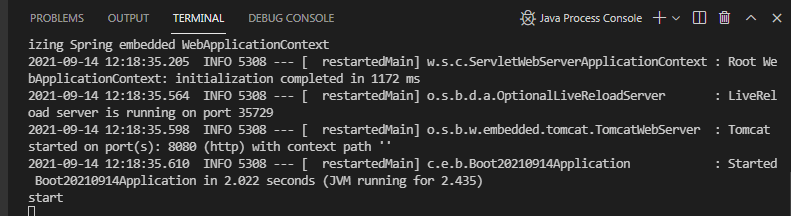
*구동(Boot20210914Application.java)
**dependency 설치 후 구동는지 확인
package com.example.boot_20210914;
import org.springframework.boot.SpringApplication;
import org.springframework.context.annotation.ComponentScan;
@ComponentScan(basePackages = { "com.example.controller" })
public class Boot20210914Application {
public static void main(String[] args) {
SpringApplication.run(Boot20210914Application.class, args);
System.out.println("start"); <-- RUN 한 뒤 terminal에 출력 확인
}
}
*HomeController.java (controller)
**controller 폴더에 HomeController.java 생성
package com.example.controller;
import org.springframework.stereotype.Controller;
import org.springframework.web.bind.annotation.RequestMapping;
import org.springframework.web.bind.annotation.RequestMethod;
@Controller
public class HomeController {
// http://127.0.0.1:8080/qqq
@RequestMapping(value = "/qqq", method = RequestMethod.GET)
public String qqq() {
return "qqq";
}
}
*환경 설정(application.properties)
**환경 설정 변경 후 teminal을 종료한 뒤 다시 run 해야한다.
server.port=8080
spring.devtools.livereload.enabled=true
*실행할 수 있도록 등록하기(Boot20210914Application.java)
package com.example.boot_20210914;
import org.springframework.boot.SpringApplication;
import org.springframework.boot.autoconfigure.SpringBootApplication; <--추가
import org.springframework.context.annotation.ComponentScan;
//실행하는 곳 패키지를 여기서 확인 할 수 있느냐
//controller, entity, repository, security ...
@SpringBootApplication <--추가
@ComponentScan(basePackages = { "com.example.controller" })
public class Boot20210914Application {
public static void main(String[] args) {
SpringApplication.run(Boot20210914Application.class, args);
System.out.println("start");
}
}
*구동(http://127.0.0.1:8080/qqq)
**현재 페이지를 만들지 않았기 때문에 사진과 같이 나오는 지만 확인한다.

*bootstrap 설치
** 다운로드 후 압축 해제하면 css, js 폴더가 있다.
** 이 두 폴더를 vscode의 static 폴더에 넣어준다.
'Spring' 카테고리의 다른 글
| Spring 일지 #6 (20210914) 화면 구현(insert, select) (0) | 2021.09.14 |
|---|---|
| Spring 일지 #5 (20210914) 오라클 연동 (0) | 2021.09.14 |
| Spring 일지 #4 (20210914) home.jsp (0) | 2021.09.14 |
| Spring 일지 #2 (20210903) Item 등록, 목록, 삭제 (0) | 2021.09.06 |
| Spring 일지 #1 (20210903) 스프링 설치, 실행 (0) | 2021.09.05 |